5 ‘just-around-the-corner’ Trends that Will Make 99% of Property Management Companies Obsolete in 5 Years (And How You Can Ride these Trends to complete MARKET DOMINATION for your Real Estate Agency)

The times they are a-changing indeed.

Property management – as it is known – or as it was known in Australia for the last 50 years is undergoing a massive shift – and the trends discussed here open the door for property management holding companies that take advantage of these trends to consolidate power across Australia and multiple states.

Also taking advantage of these trends will allow real estate companies to remain competitive, thrive and dominate in their area.

Everything I speak about I have witnessed in working with, and speaking with real estate agents in the real world – so this is not some “armchair academia” type piece – so I apologise in advance if it is a bit more informal – I believe if you adapt these changes in your holding company or your property management company you will see a sharp increase in closed property managements and retention of your current rent roll.

So… let’s get straight to it – ACTIONable points based on trends.

Tenants do not want to speak to you (Property Management AI)

Based on in-field research not only do tenants not wish to speak to their property manager directly – but they report much higher satisfaction scores from dealing with an AI based rental system like Rental Heroes vs. dealing directly with their property manager.

Think about it – in these days of instant – on-demand services – tenants expect to be able to open an app and report any property issues with a few presses of a button – take a photo of their issue – answer any relevant questions – and then await a time and date for when a tradesperson will come to fix the issue (or if any other information is required).

Not only is this a win for the tenant but it is also a win for the property management company – who will no longer need to handle tenant complaints/issues and deal with potential interpersonal conflicts.

And even finding a tradesperson to fix an issue is once again something that can be done automatically or by a centralised/white-label service – so if 90% of your property manager’s time is being spent handling tenant issues than that is an issue and a massive opportunity for streamlining costs.

2) Following Through and Being Honest is not a Differentiator (Property Managers ➝I nvestment Acceleration Specialists)

It is very rare to see landlords thrilled with their property management company. While it is not politically correct to say this – most investors see their property manager as a sort of “tax” that they have to pay to receive their investment income – sort of like a gas bill.

Of course property manager do much more than this – they have to find a tenant and get paperwork signed – but once everything is setup things go on auto pilot – and especially if you have a multi year tenant lease many investors can look at a property management fee as one big expense without a lot of upside.

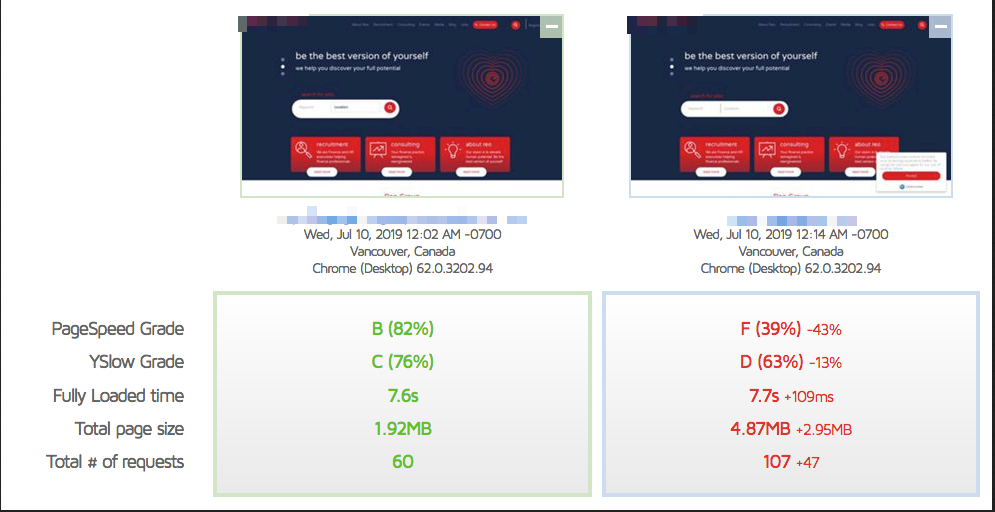
For most property management companies their point of difference is literally “we do our job” – as this screenshot below illustrates:

[image:F1177E26-5684-47F2-AD0F-FB50EB1F630F-554-000000AD1A0260BA/Image 2022-02-25 at 1.19.01 pm.jpg]

A typical property management company whose point of difference is that they “follow through” (as opposed to… not following through and doing anything?) – and they communicate “factual information” (which I guess is better than lying to everyone).

On a serious note most property management companies offer bare bones service and are only used because they’re in the area so to speak – which as we’ve learnt from trend #1 is going to be less and less of a competitive advantage as time goes on.

The solution to this is to start offering investors MORE – more value – and the best way to do this is to rebrand the “property manager” to an “investment acceleration specialist” – your team must be repositioned from the “people that collect the rent and call pest control/tradespeople when issues come up for an investor’s tenants” to investment specialists that advise an investor on how to maximise their income –

Because let’s be honest – when all is said and done – all that matters to an investor at the end of the year is how much money they put in their pocket from the investments that a property management company manages – everything else is wondow dressing.

You would think property management companies would spend some time figuring out how to help the investor achieve this – but you’d be wrong.

Calling competitor’s investor clients and simply asking if their property manager has ever spoken to them about rental increase strategies/tax minimisation/legal compliance and fine avoidance – and offering a trial or refund guarantee for a service makes easy pickings for any property management company that is willing to put in the work to easily grow and dominate (especially when this sales effort can be systematised) [link to REAA].

3) You Don’t Need to Tell me Where the Bathroom Is (Contact-less Inspections)

Sure – you might say – tenant issues can be handled through a centralised white label service but the property manager is still required to do property inspections for new tenants.

That will always be required – right?

Well – actually, no.

There are all ready a number of software and hardware solutions to automate property inspections – and these will actually be a win-win for the tenant and the property management company.

Firstly – we all ready know that forcing potential tenants to inspect properties at a time convenient to the property manager all ready scares away many high quality potential tenants (surprise, surprise – the best tenants actually have things to do at 1pm on a Wednesday when the property management company forces applicants to inspect – or whatever it is) – which leads to issues down the line.

The other option is flexible inspections – which means most property managers are running around showing properties and filling their calendar up (and cursing no shows) – an expense that simply cannot be maintained moving forward.

By the way – as someone who was looking for a property earlier these inspections are never fun for the tenant either – after running 15 minutes late due to traffic I called the property manager who was meant to show me the property – only to not be able to reach them, followed by being told that the inspection cannot go ahead because the property manager had to rush off to the next inspection – as someone who pays my rent on time and stays in a property for multiple years – I chose not to deal with that company because I am petty (and they lost another potential tenant to select from).

So – what’s the solution?

One doesn’t need a crystal ball to see the future because most of what I am talking about all ready exists.

In fact if you want to know what property managers are going to be doing 5 years in the future just look at what AirBnB owners are doing right now in the USA and other countires.

Hardware like the Igloo lockbox along with a key GPS tracking system allows you to grant one time PIN codes to people inspecting a property – and having the key attached to a GPS tracker means no one can take it away and duplicate it (you want to have every precaution – and I tend to always err on the side of caution).

Since you will only be granting the one time PIN code to potential inspectors who would ideally – share their details with you the chance of something happening is very minor – you can also install a motion detection camera at the front door if necessary.

By the way this isn’t some futuristic tech pipe dream – doing a personal calculation based on the items I’ve mentioned (and I have provided the links above) comes to the following:
1) Igloo lockbox – $179USD
2) Key GPS (optional) – $40
3) Motion dection camera (optional) – $179 (Nest camera from Google which will give you time stamps and video of people coming and going)

For a total of under $400 you have a system that can be installed in any property which removes the headaches of in person inspections – makes life easier for the tenant (believe me – the tenant does not want to inspect a property that they are looking to potentially live in long term with someone standing over them telling them obvious things like “this is the bathroom” and other un-necessary information) – much less doing it with 4 other strangers who are inspecting the property as well.

P.S. At the time of writing Kogan has a sale on motion detection cameras for as low as $38 – which drops the whole package down to under $260 for one property

[image:07B90BD3-E0E5-4927-8A4F-C65D378F406B-554-000000AD1A00A301/Image 2022-02-25 at 2.02.22 pm.jpg]

However the amount of people inspecting the property can also drop dramatically and save effort for everyone with of course…

4) The 3D Virtual Tour

3D Virtual tours are here – and they’re not reserved for film makers – the equipment required to create a virtual tour is dropping significantly – in fact if you have a centralised office you can bring tenants in and give them virtual tours using a 3d headset (isn’t the future amazing?).

Again even writing this sounds like something out of the future – but all of these things are not only available now – but are also very competitively priced.

The Virtual tour has a number of benefits – as potential tenants will be much more engaged in properties where they can look around in first person rather than looking at photos from the side – especially because every tenant knows photos are taken to make the property look as attractive as possible and may not always represent the true spatial dimensions (especially with the selection of certain lenses that make rooms look bigger than they really are) – a virtual tour (or 360 photo) eliminates this.

By the way you don’t have to worry about buying 360 equipment – because with services like Snappr – you can login and schedule a photographer to come in and take all the 360 photos you want – and it’ll only cost you around $179 per property (sometimes less) – and Snappr is available anywhere in Australia as an on demand service.

The most popular real estate directoreis/platforms like Domain all ready have 360 photos allowed – and I want to stress the “contact-less” nature of this. Because you can get the photos taken by a photographer who you can grant a one time pin to – using the Igloo lockbox (in the previous point) – and it’ll save time for everyone as you will only get tenants that are 100% serious about moving in – since after a 360 tour the physical inspection is most of the time a mere formality.

Along with a digital signature service like Docusign – you could have everything signed and ready pending a physical inspection for move in – and make everyone’s lives easier… the new tenant could even have some of their items to move in on the first inspection.

5) The BDM Property Manager Hybrid

In the future there will be no “property manager”. The idea of someone whose job is solely to show people around properties, attend to tenant issues, shortlist applicants and chase up rents will not exist.

The reason for this is – as stated before – most of these jobs will either be outsourced to AI software like Rental Heroes (for issue management) – with inspections being replaced by hardware/software solutions – and any other remaining issues outsourced to a centralised white label property management service.

However even though many of the traditional jobs that the property manager does now will become extinct this is not to say the job itself will no longer exist – it will – however it will simply evolve to a Property Management/BDM hybrid.

There are all ready “Property Management BDMs” out there – or property managers who also have the dual responsibility of developing business now – however this will become standard in the future. Any property manager that does not possess BDM skills will find it more and more difficult to find a position in any real estate agency that is looking to streamline its services.

While many of the tenant facing services will be white labelled – the investor facing services will need to be doubled down on. The one with the gold makes the rules and the investor – who will have more and more options for the management of their property – will expect more in the future (tenants will always just want a place to live without anything breaking down etc.)

The Property Manager BDM will be responsible for closing and retaining current business (many property management companies lose approximately 10% of their managements every 6-12 months – a management retention campaign could be the best investment you ever make in your business – since a 500 managed property rent roll would lose 50 managements a year – so plugging up that hole would be extremely valuable).

As far as Business Development goes however this will not involve making continous calls to investors and turning a real estate agency into a call centre – rather this will involve talking to investors and learning how to bring value to those investors – in the form of tax minimisation, legal protection and asset maximisation strategies – and engaging in conversations with investors in assisting them in these elements.

The property management company that can retrain their property managers into Property Manager BDM’s will thrive – my REAA package includes the first step to doing this – lowering your retention rate and also setting up a foundational proven system to grow your rent roll on auto pilot (without acquisiton).

Well that’s it for the trends – the reality is that while technology is evolving rapidly it does take a lot of time for traditional “status quo” industries to catch up – for now managements may seem safe but the market is poised for a huge disruption by a player that can reposition itself from simple “rent collector” to “investment acceleration specialist” company with a trained property management BDM staff and scale nationwide with a centralised support team and contact less inspections (which by the way will make all the COVID avoidant people very happy).

The question is not will it happen – but rather will you be positioned to ride the new wave or will you be one of the company that is acquired and gobbled up.

6 Mistakes 99% of Real Estate Agents Make when It Comes to Scaling their Agency using the Telephone

My goal with this article is to show you how I book one to five appointments every hour using cold calls. I’m also going to show you how the software I use ensures that I positioned myself correctly for those appointments. Finally, I will show you how you can apply this system in your own real estate agency. 

By implementing this strategy, you’re going to be able to increase your appointment rate—especially if you feel that your current system isn’t working right. I bet that you will be able to increase your appointment rate by at least 400%. And even more importantly, prospective property investors or sellers are going to be excited to work with you and see you as their number one choice. 

Let’s start by looking at the most common mistakes real estate agencies make when creating a cold-call appointment booking system.

Mistake #1 – Not rejecting themselves early & using email software

Your email list is powerful. In fact, email remains a powerful medium to generate sales. We all know that. But what you might not know, is that mass marketing email software is useless in the current market. Here I’m referring to programs like MailChimp, Aweber, or several other mass marketing email software packages. 

Your rent roll and past customers and sales walk in list is powerful

Let me explain why I recommend that you throw all of the stuff out. Firstly, nobody is opening up email newsletters in 2021 anymore. The reality is that there’s already too much information floating around on the internet. 

However, your biggest problem isn’t that people are ignoring your email campaigns. The problem is that most people—even your happiest customers—aren’t able to see your email campaigns.  

I’ll prove it to you, and this is something you can try out for yourself. If you create a Gmail account, you will see at the top of your window a tab called promotions. Do you know what that is? When you send mail through popular email marketing software such as MailChimp or Aweber, it leaves a digital trail. If Gmail gets even a whiff of that digital signature, that email is stored under the promotions tab. Which means your prospects will never see it.

Most of the time your email campaigns will not even be seen by your prospects – as most will go into the ‘Promotions’ tab automatically

 What normal person would click on that promotions tab to read all their spam email or access old email newsletters? It seems to me that only a crazy person would do that—not exactly the kind of customer you want. 

Mass marketing email software is ineffective in 2021. What you want to do instead, is send an email to your entire prospect list from the email address of the staff member who’s about to call on the phone—using that staff member’s email signature. What do you write in that email? Tell them the truth: that you’re about to call them because you want them to become your customer. The important thing is to give them the option to opt out of being contacted by providing a link.  

Most marketing software is ineffective in 2021

Just be upfront. Hey, we’re about to phone you and give you a sales pitch. We want to talk about what it would take to make you our newest client. But if you don’t want to hear from us, please press this button. 

In this way, the customer can opt out of hearing a sales pitch before you even make a call. So when your sales staff phones them, they’re not going to be rejected outright. Which makes it much easier to make cold calls—and takes away the biggest obstacle people have for calling up someone they don’t know. 

This is a way for prospects to give you tacit approval to reach out to them and basically see if you can do business (especially when combined with the strategy from the next section). This is also going to get buy-in from your sales staff, especially your property management team. And believe me, you’ll hear fewer excuses from them like: Our investors don’t want to hear from us; they don’t want to hear our sales pitch; or they don’t want us to bother them. 

Since the customers have already given their tacit approval, your staff will have less reason to complain. Which will lower your staff turnover. Who do you think is going to burn out faster—the staff member who phones prospects who are already willing to enter into a conversation, or the one who faces repeated rejections over the phone? 

Allowing prospects to opt out of being called, is an easy solution to a difficult problem. On the cold emails I send out, I have three unsubscribe links and I get a 10% unsubscribe rate on those emails—which isn’t bad at all. How do I handle those people who opt out of receiving a call? I keep my word. They will never hear from me again. 

In summary, get rejected earlier. It will lower your turnover rate.

Mistake #2 – Narcissistic Marketing

I’m going to tell you something you probably already know. You’re not the only real estate agent in town. You’re also not the only property manager in town. Here’s something else you probably already suspect: nobody reads your blog posts. 

I know SEO. Check out some of the case studies I feature on my website. In one particular case, I generated $71,000 worth of additional organic traffic for a customer. Trust me when I say that most real estate agents don’t get the right information about their content strategy. The problem is that most real estate agents use SEO agencies that know little to nothing about real estate or how that industry works. 

The results of one of my case studies

Let me go back to the telephone for a second. The one thing your real estate agents and property managers probably don’t want to hear when they pick up the telephone is the following: “Your pitch sounds great. In fact, we are looking to sell our home/we’re not happy with our current property manager. Why don’t you send us an email? We’ll look it over and talk later.” 

What does the agent do? They send an email explaining why they’re the most amazing real estate agent in the world, and then they beg the customer to pick them. Which turns into more follow up phone calls and more emails—which is about the least fun part of being a real estate agent. Who wants to be the guy who has to make all those calls and send all those emails? It’s no wonder staff turnover in real estate agencies is so high. 

No one wants to be the person calling up out of nowhere and annoying people – lest of all property managers with little sales experience

The issue is that when they pick up the phone, they give no additional value to the prospect except pitching a commercial to them. Switching from narcissistic marketing to value added marketing is the greatest gift that you can give yourself, your company and your agency’s income. 

If you look at real estate agency websites, they look almost identical. From their websites you would think that all agencies are the same. But from my conversations with real estate agents, I found that every real estate agency is unique. Every real estate agency has a different approach and methodology. Some only do auctions. Some don’t do auctions at all. Some focus on the interior decorating to position a home—while others literally manage and do entire renovations on homes.  

Let me ask you this: in the last 5, 10 or 15 years of operation, did your agency pick up a thing or two about selling or managing properties? Have you learned anything about getting results for your customers? Did you learn anything about sales—about facilitating faster sales times, achieving higher property values, and going through the process with less paperwork and stress? As a property management, did you learn to lower vacancy rates, achieve higher rental yields, and lower maintenance costs for your clients? 

Now, answer this question: Do you think the insights you picked up over the years of  serving customers could benefit your future customers? Of course they could! And do you think your future customers would appreciate learning about your insights? Absolutely! So why don’t you create a piece of content—especially a video—around one of those insights? 

You could then send a link to that video content to a customer who asks to be contacted by email—instead of your normal sales pitch. This is highly effective. Why? Firstly, because people will actually watch your video. Nobody’s reading sales pitches or blog posts anymore. 

Secondly, video content will position you as an expert in your field. It will also give you the benefit of the celebrity effect. When people see someone on video, subconsciously they start to see that person as someone important—even though almost anybody can make a video these days. 

Video is a great way to get someone on your wavelength and bring them over to your point of view. It will make them more inclined to work with you. You’re going to give them insights, and you’re going to change their focus to the solutions you’re able to provide them. 

And finally, sending out content emails will save you time. It will save you from having to repeat the same information in every sale appointment because it will already have been covered by the video content you sent out. Which means that you can put more of your focus on meeting your prospects’ unique needs. You will close more deals, faster, and easier. 

When you get into the habit of creating high quality content, people are going to look forward to hearing from you. Your sales team is going to have a much better time engaging with prospects—and they will actively buy into the process. 

Which means you’re ready for the next step.

Mistake #3 – Failing to check the pulse

I’ve got an uncomfortable truth for you: Your prospects will lie to you. Most people lie to themselves on a consistent basis. It’s just the way the world works. Prospects will lie to you for various reasons. Maybe they’re afraid to tell you how desperate they are to find an agent and sell their property as quickly as possible—or how horrible their current property manager is and how much they want to get rid of them. 

Why would they lie to you? Because they’re afraid you may use that information against them—even though you need the right information to solve their problem quickly. 

Some prospects are going to be very friendly—but no deal is forthcoming. Other prospects are going to be gruff and closed off, but they’re dying to make a deal happen. 

Most real estate agents have no idea where they stand with their prospects because they don’t check the proverbial pulse. How do you read a customer’s actual intentions? With a little-known tool called “read receipts.” 

Do you know what a prospect does after you get off the phone with them and you send them video content? Do they open the email? Do they watch the video? Do they watch the video once, twice, three times? Do you even know how to find out? 

Let’s look at the problem of getting buy-in from your property management team or your sales team. Perhaps they complain that it’s a waste of time to call prospects because they’re just not interested. Wouldn’t it be useful to show them a report that some people clicked on the video you sent out once, twice, or even three times? (I’ve had prospects click on a video 13 times or more.) Wouldn’t such a report be useful for your sales and property management team to do follow up?

What’s more, could you think what a lovely conversation they could have with the prospect—asking them what they thought about the video? Or how would you like to go into a sales appointment or an appointment with an investor knowing they’ve watched a whole bunch of content? Do you think it’s going to be easier to win over the prospect and make a deal happen? 

If you follow this approach, you’ll stand out from every other property manager and sales agent in the market. I can guarantee they’re going to see you in a different light. At they very least, they’re going to remember you. If you create a sequence of highly valuable content that you send prospects, they will remember to keep the appointments you make with them.  

So check the pulse. Turn your real estate agency into an on-demand appointment generating machine. Turn your staff into a group of people who enjoy their jobs and are sold on what they do—because they’re not annoying people with commercials anymore.

Mistake #4 – Bad Data and whistles

Now I’m going to mention a topic that’s really boring: the organisation of your data. Part of my technical background is custom designing CRM systems. Over the years, I’ve used every CRM under the sun: HubSpot, Salesforce, Zoho, you name it. Unfortunately, most are more trouble than they’re worth. 

Now, CRM systems are valuable in theory. They’re useful out of the box—until you need to adjust the software to suit your specific needs. This usually means that you have to send an email to customer support, wait two or three days for their response—only to be redirected to a 200 page manual to fix the program yourself. Does that sound familiar? What’s worse is that by that time your data is already trapped in the software and you can’t get it out. Which is not a good position to find yourself in.

I’m not going to tell you how to organise your data, but I can give you advice on software that will make your organisational work easier. When it comes to generating appointments over the phone, I like to go with a lean, mean piece of software. Preferably software without all the bells, whistles and distractions of these large CRM packages. What you need is a tool to sift through your data to extract the gold nuggets before you enter that data into your CRM.

What would I recommend? If there’s one tool that everybody on your staff already know, it’s Excel. But Excel lacks a lot of the database functionality of a CRM. So what if I told you that there is a tool that combines the functionality of Excel with the benefits of a database like a CRM—without all the bloat? A tool that is also fully customisable out of the box? Wouldn’t that be cool?

There is a piece of software which combines all of these features, and it’s called Airtable. Airtable is really easy to set up and to customise to your heart’s content. What’s more, they already have real estate solutions for you to use. In my experience, you can set someone up on an Airtable and get them using it proficiently in five minutes or less. 

There’s a saying that the best CRM is the CRM you actually use. Well, I use Airtable every single day and I love it. 

Mistake #5 – The Big Blue Cancel Button (Scheduling Software)

Online calendars and scheduling software is nothing new. What is new is all the creative ways you can use these tools to get buy-in from your prospects when you book appointments—so that they actually keep their appointments. 

Let me share the strategy that gets me one to five appointments with top real estate agents every hour with ease. I will also show you how to apply this strategy to your own real estate agency.

My focus isn’t on overcoming a prospect’s objections to booking an appointment. Rather, I focus on making it as easy as possible for the prospect to cancel an appointment I already booked with them. Then I use the power of my follow-up sequence (I call it the “power sequence”) to get buy-in from the prospect so that they look forward to engaging with me in future.

I find that it’s easier to book appointments with prospects if they feel that they can easily change their mind and back out. This also helps you to separate those prospects who are truly interested, from those that aren’t. Which means it’s a win-win for both of you.

If you think about it, an appointment is really nothing more than a tentative callback. When your property management team makes sales calls, all they’re doing is getting buy-in from prospects for tentative callback times. Then it’s the job of your amazing video content and your power sequencing to lock in those appointments. This is how you get a team who may not all be sales superstars—especially on the property management side—to easily book appointments and have those conversations.

On the practical side, don’t send the client an invite link to book an appointment for themselves—book it on their behalf. Here I recommend Calendly scheduling software. Anybody can be easily trained to use their system. You don’t want your staff spending all their time booking and confirming appointments. Let Calendly do that work for you.

In my appointment booking emails, I include an automatically generated big, blue Cancel Button to make it easy for prospects to back out of an appointment. I also include a link at the bottom of every email which allows prospects to easily reschedule or cancel the appointment. Which makes them feel a lot more relaxed.

A callback appointment doesn’t have to be for 45 minutes. All you need is an 18 minute callback time. I can guarantee you that once a prospect goes through your power sequence (which includes the video content that you’ve developed), they will want to make a lot more time to spend with you.

Do you see the potential for this system to book more appointments and rapidly scale your agency?

Mistake #6 – Lacking Beautiful Positioning Forms

Many agencies have a form on their websites the prospects can fill in to request an appraisal. Then, once they have a meeting with your agents, they fill in a physical form while the agent asks them a bunch of questions.

But is it really a good use of your prospect’s valuable time to make them fill in two separate forms? Couldn’t the prospect fill in the same information prior to the appointment—and allow you the time to use that information to prepare for the meeting with them?

Welcome to “beautiful positioning forms.” I have an example here which I use on my own website—a form that has helped me scale my business from charging between $1,000-$1,500 to $5,000 a landing page. 

You can tell your scheduling software to send this form to the prospect automatically once their appointment is booked. Your property managers shouldn’t be emailing these forms, these forms are sent out automatically.

The key is to use the process of the prospect filling out this form, as just another way for you to position yourself as the number one choice for property management services in your area. How do you do that? By asking the right questions on the form—questions that illustrate how you’re the perfect agency to meet your prospect’s goals. 

For example, you could ask them about their current property manager. You could find out how much rent they are collecting on the property—much rent could potentially be collected from the property through rental optimization. This question makes them consider whether they could be getting more rent. It also puts the idea in their head that your agency might be able to help them achieve those higher numbers. 

You’re not making promises you cannot keep. Rather, you’re positioning yourself as somebody that’s asking the right questions. You’re a company that understands what the prospect is trying to achieve. You’re working with the prospect to achieve their goals. 

On the other hand, if you put an expensive-looking form in front of the customer to fill out, is it going to convince them to work with you, or make them wonder whether they can afford your services? Can you spot the difference? 

Remember, the pre-appointment form is not just about getting information, it’s about positioning yourself in your client’s estimation. This will further shape their opinion of you before you walk into that sales meeting or pick up the phone. I’m obsessed with the word “positioning” and use it regularly in my everyday conversation. 

This is because the way you’re perceived by your prospect prior to the appointment is going to determine the likelihood of you closing a sale.

Conclusion

The common denominator I see in all the top producing real estate agents I speak to, is that they’re willing to invest aggressively and proactively into their own self-development and education. That’s why I would like to congratulate you on finishing this article. You’re investing in your own personal growth, learning, and also your agency’s growth. 

If you can see yourself implementing the system I’ve outlined in this article, I would love to have a further conversation with you. 

If what I’m writing here makes sense to you, why don’t you contact me? Please use the “Book a Consultation” link below to schedule a tentative callback. Choose a time that will work for you and let me know if you’d prefer a phone call or a zoom call. I only need 18 minutes of your time to see if we can do business together. 

If you don’t want to make use of this opportunity, that’s fine by me. At the very least, I hope this article sparked your imagination and gave you ideas which you can implement in your own business.

Drop It Like It’s Hot – 6 Principles to Stop Burning Money on Real Estate Letter Box Drops (and Ray White’s Secret Letter Drop Weapon)

Introduction

I just recently cleaned my letterbox, which was well overdue. There were lots of letters, especially from real estate agents. I work with real estate agents, so I thought I should make a video about it!

The thing with letterbox drops, is that the principles that apply online, apply offline as well. Many of the same principles apply with the letterbox drops, apply with Facebook advertising and your online landing pages as well. They just have a different medium. 

With that said, it helps when you research what your competitors are doing! This can be difficult as some of them aren’t in your area. So, I thought it would be interesting to see who is doing it right and who is doing it wrong. So, let’s talk about the principles and start rating them!

Principle 1: Open Your Window to the Soul- For A Reason- The Good, the Bad and the Ugly of Showing Yourself

Some people reveal too little (moving somewhere with family), too much (which bores the prospect), or nothing at all (being a professional of 25 years). These strategies don’t work very well.

Introduce yourself as a real estate agent. Tell people who you are and include photos! With a photo usually comes a bio, which is very important. It creates a connection between the prospect and yourself. People don’t want to look at pictures of buildings. 

How do you write about yourself? What do you write? Well, I will show you some examples of how to do it correctly and how to do it incorrectly. 

The Generic Insight- Forgettable

The generic insight is where people will make themselves look like a 2D cutout. One example is with Carmen Briggs. The letterbox says, “Your local agent, Carmen Briggs, is passionate about people and helping them to achieve their dreams. Selling a property in the Inner Western suburbs of Brisbane for over fourteen years has not only given Carmen intricate knowledge of the area and its changing market dynamics, but also an extensive and loyal client database… exceeds their expectations…. personal commitment.” 

She is the agent I would choose to use, even though she doesn’t have a good bio.  So just because the bio is off, doesn’t mean they will be terrible. The bio is just a great way of presenting yourself. 

If you say you’re passionate, well, is that relevant? Would you really say that you’re not passionate? 

One way to check what you’re saying is to ask yourself if it has relevance. If you say you’re passionate, well, is that relevant? Would you really say that you’re not passionate? Everyone would also say they’re committed to customer excellence. Therefore you’re not positioning yourself different from others in any way by saying these things. Some things mean nothing and can be copied and pasted on any website. It’s forgettable, and when people read it, they zone out.

The Irrelevant Insight

An example of this is, “Steven stepped out of his civil engineering career in 2015 and joined his wife, Kathleen luck, in their small family business. He wanted to create a better work life balance for his family and support Kathleen in the growth of their real estate business, situated in Brisbane’s inner West suburb of The Gap.”

Steven Doyle bio reveals personal things about himself.

This bio is better than the original one I showed because he reveals personal things about himself. This is great, but the problem is, a lot of the stuff is irrelevant. For example, being in civil engineering doesn’t have anything to do with real estate, and he’s basically saying he dropped out. So, not the best way to start.

Another example is saying “I like basketball”, which is also irrelevant. Although it’s a nice gesture to reveal things about yourself, there’s not much to be said there. People won’t say, “that’s great. I want to use you as a real estate agent,” after simply hearing that. Again, It’s irrelevant.

  •  

The Shoot Yourself In The Foot Insight 

This is where you say things that make it better for you not to have said anything at all. In this next example, she has a photo which is great, but then she describes herself as a mum, driver, chef, tutor, cleaner, nurse, family planner, financial controller, and one of Brisbane’s most refreshing real estate agents. 

Alex Rutherford’s bio description. This is where you say things that make it better for you not to have said anything at all. 

As you can see, most of these have nothing to do with real estate. They come with lots of questions. I would take out a cleaner, because is that really what you want people to think of you? I would take out the driver, because what does that mean? We all drive cars. I would also take out a nurse. Does that mean you’ve been a nurse and just started doing real estate? Maybe this means you tried different things and aren’t reliable. Overall, this is a shoot yourself in the foot example where you’re bringing people in but then turning people away with what you say.

The Conversion Implication Insight – Ray White Example

This is the gold copywriting standard of how to write about yourself. This example is from Ray White and her team of copywriters.

“Bridgette’s fascination and appreciation for real estate was established many years ago, having had a father who was a builder and a property developer. Bridgette fully understands the stresses in buying and selling houses, having bought, sold and renovated many of her own properties prior to her entry into the real estate industry. When you couple her local market knowledge with family values, integrity, and her proven track record as a real estate agent professional, Bridgette has to be your first choice.”

Gold copywriting standard from Ray White.

The wording is beautiful and amazing. You find out things about Bridgette that have meaning and implication with it. It shows that she has experience through herself and her father. This is pertinent to the value she provides. 

By saying, “Bridgette fully understands the stresses in buying and selling houses”, she again speaks to the prospect by showing how much experience she has. When you talk about yourself in this way, you’re telling a story and sending a message to the reader. You’re showing your value. This is a perfect example because this is what will get people to call you.

Principle 2: A Picture Tells a Thousand Words. What do your photos say about you?

You Want to Show Your Window to the Soul. 

Look into the camera. Our eyes are so essential and say many things. We also connect with people this way. For example, in this picture she is looking at the baby and not the camera. When you aren’t looking at the camera, it makes it seem like you are hiding something.

Kathleen Luck looking at the baby and not the camera.

Avoid the “Combat Stance”.

How you stand is so important. In this example, one of the guys is holding his hand around his private area, like he’s defending a soccer goal. Don’t do a soccer stance! You want to have an open stance. Also, don’t put your hands in your pockets like this other man. This makes it seem like you are uninterested. 

Move to the side, smile and stay relaxed. Confidence is attractive! The lighting is also important. Find a photographer who understands lighting and visual cues!

Jack and Stephen Dangerfield doing combat and soccer stance.

Bonus Tip: Generic and Irrelevant Stand Ins

This is where you have a photo of something that doesn’t matter. It has nothing to do with the website or content itself. For example, this photo of a house and a dog. This is a fantastic brochure, but the photo is generic. I see this on so many real estate websites. 

Picture of the inside of a home and dog on a letterbox drop.

Some also put photos of the insides and outsides of homes. Both of these are forgettable and add no value. The top conversion optimization experts know how important people are in this situation, that’s why car commercials and insurance commercials have pictures of actual people. 

Use Your Family.

This may sound bad, but families comprise the largest target market of property purchases. 

So, create photos of you and your family. A great example is the post by Remy Duriieux below. Whenever you go on a family outing, take pictures and upload them! This builds trust, similarity, and a connection. They say, “Oh, you have a family, I do too.” You’re much better off using a picture of you and your family in your bio. This makes you a real person to your prospects.

A great example is the post by Remy Duriieux. Whenever you go on a family outing, take pictures and upload them! 

Principle 3: Be More than Just a Pretty Face- Pretty vs. Conversion Optimized Design.

Whenever people go to make websites or pamphlets, they focus on making it look pretty. This is great, but there is a difference between making something that’s pretty and something optimized for conversions. These are two separate skill sets. If I had to choose one, I would choose the one optimized and written very well. When your copy, layout and focus points are out of whack, it can break you.

Layout Hierarchy.

Make Certain Things Bigger. 

For example, your awards! When you make your recent property sales bigger, you’re not achieving much. You’re supposed to sell properties. No one is impressed (unless you sold it over a reserve, within a quick turnaround, or set a record for the suburb of the street). 

Below you see some serious accomplishments that should be made bigger. For example, “Agent of the year for The Gap”, “No 1 sales consultant residential” and the other awards are small. These are huge achievements and should be put in a prominent position. This usually happens because women are encouraged to be humble, but this is not a good strategy if you are advertising.

“Agent of the year for The Gap”, “No 1 sales consultant residential” and the other awards are small. These are huge achievements and should be put in a prominent position. 

Make Certain Things Smaller. 

For example, sections for selection of recent property sales. People expect you to sell properties! This is not important. No one will be impressed by this. 

Carmen Briggs letterbox that needs certain things smaller.

Remove Some Things. 

Remove what doesn’t add to your cause and things that work against you. Example: how many offers were on a property. If you only had 2 two offers, and put that on the letter, this wouldn’t give many people confidence in you. Putting that you had 3 inspections and only 700 views is also not impressive! I would completely remove this section.

Carmen Briggs letterbox that needs some things removed.

Focal Points. 

What are your eyes drawn to first, whether with a letter or on the internet? Your eyes go to whatever is highlighted. So put focus on impressive numbers rather than their titles! 

If you’re writing a long block of text, highlight what’s important, for example, the 21 offers made, and 83 buyer inspections in 24 hours from the example above.

Understand what you want to bring attention to. If you’re writing a long block of text, highlight what’s important, for example, the 21 offers made, and 83 buyer inspections in 24 hours from the example above. Make them red and bold as a vocal point. Also highlight years of experience. The property is not what matters, it’s the results you achieve with it.

Overall, your brochure can look pretty, have the perfect color scheme and still fail you. You need to make achievements bigger, past property sales smaller, remove unimportant numbers of inspections and offers, and draw eyes to what’s important.


Principle 4: Go Narrow and Flood —The Importance of Consistency.

If I look at letterbox drops, the one thing you’ll note is consistency. Everyone has sent me one letter. Ray White has sent me three items in a relatively short period of time. 

Why is this important? You need to narrow your focus and go into one area/suburb and flood it with a ton of repeating messages. This creates a more focused budget. Going off a smaller area brings more success than trying to reach everyone.

Living room in Ashgrove market report.

This concept also applies to facebook. People think it’s a one time thing- you pay facebook and leads come. Sometimes you have to wait- 7 times.

Most advertisers do the same thing- pay for one advertisement and wonder why they aren’t getting results. The truth is people have to see things multiple times for it to click and for them to remember it. 

This is what I do with my clients- even if someone books something with me, I send a ton of content before the appointment. The reason is I’m positioning myself in the appointment so they know who I am. Also send emails, which is another thing I do. They tell me they’ve never had someone email them so much – but they end up watching my videos.

Principle 5: Don’t Insult a Customer’s Intelligence.

“Obligation Free Appraisal”, “Free Appointment”, “Free Appraisal”

Putting this on a letterbox drop is sleazy. What does this mean anyways? If they come into your office, are they obligated to do business with you? 

Dangerfield’s letterbox drop that includes “Obligation free appraisal”.

No one charges to book an appraisal. It’s expected to be free. No one will be excited to meet with this real estate agent for saying this. 

Instead talk about what they’ll receive in the appraisal. Provide a personalized marketing strategy (based on your experience of selling 500+ properties in your area). If you do facebook advertising, provide a custom demographic report as part of the appraisal appointment. Show them the audience you will target on facebook.

Principle 6: Men Lie, Women Lie, Numbers Don’t – Using and Positioning Numbers to Increase Conversion

Decide Which Number You Want to Display

People trust numbers because it’s harder to refute. This shows you are trustworthy. People are very skeptical these days, so be specific. Saying “our customers trust us” won’t make people trust you.

Zac Tully Example

The example below is very popular with new agents because they have to prove themselves. 

Saying, “83 buyer expectations in 24 hours, 21 offers made, 6,885 views online, 50+ buyers still looking for a family home in Ashgrove” on your letterbox drop is a very smart move. 

Use great numbers of buyer inspections, offers made, and views online. Use numbers that are believable. These numbers show that he’s good at selling real estate. 

Another example is showing the most recent sale and showing the amount of views his property got compared to average on the site. This shows how much traffic he drove from facebook to the property. 

Use great numbers of buyer inspections, offers made, and views online. Use numbers that are believable. These numbers show that he’s good at selling real estate. 

Don’t Use Numbers Against You

Don’t use low numbers. This will just work against you. Remove numbers not adding to the cause. For example, “3 open homes, 2 offers, and 19 inspections”. This is not impressive and brings you down more than helping you.

Remove the numbers not adding to the cause.

7. Ray White’s Secret Weapon – All the Powers Combined

What Ray white does is offer a report, which gets a high retention rate and makes it real.

Be Different

Most of the letterbox drops are saying, “look at me, pick me. I can sell your home.” What Ray white does is offer a report, which gets a high retention rate and makes it real. People will not toss it out.

Easy To Do

The great thing about the reports is it shows recent sales, which aren’t all sold by Ray White. So even agents starting out can make a report like this.

Ray White’s fantastic report sheet that brings high retention rates.

Hyper Localized

 Ashgrove is a very small suburb, it’s not North Brisbane or Brisbane, it’s one suburb. A property report for your suburb is unique and hard to get. It’s not something they’ll be able to find at the book shop, that’s for sure.

Numbers

The “Houses and units sold last quarter” section don’t all have to do with Ray White in ashgrove. So, you don’t have to use your own numbers. The numbers build a case by showing median sale price. This is great because it’s not just saying, “look at me”, it’s giving numbers. It’s giving solid evidence.

These numbers build a case by showing median sale price.

Great Copywriting

Also write a bio and show what you can give, like the one below. It gives testimonials. In this case, a great copywriter is vital. Also, don’t be afraid to toot your own horn. You are advertising and need to show what you can do. 

A bio from Bridgette Righton that gives testimonials.

8. Summary

Think About Your Value 

All of these concepts apply to any online marketing you do, whether it’s emails, facebook or phone calls. People want to know statistics about their own suburb. So, use the statistics for the concentrated area. You also need to understand how to communicate and know the value you provide. This is why localizing your work is so important. It helps increase your value.

Use A Follow Up Strategy 

This is like what I’ll be doing. I’ll be sending this out to real estate agents and making sure they watch it. Check your own letterbox drops and all marketing materials. Advertising is very important.

Shift Your Strategy Towards Value

All the value you create will be useful for your online strategy, letterbox drop and follow up strategy. It’s easier to follow up when you have something to follow up with.

I want to be completely transparent about my strategy. I hope you’ve gotten some value from this. This will give you a better eye for good and bad advertising and you can use it in many of your own advertising strategies.

How I added $77,548.80 in additional traffic to a Plastic Surgeon’s Site Doing Nothing But On Page Technical Speed Tweaks [CASE STUDY]

Introduction

This post will go over a case study of a plastic surgeon client I had and how I was able to double its organic traffic by (really more) than 2x. The focus – or theme – of this case study is speed optimisation.

As you are (hopefully) aware – your page speed is a ranking factor for Google – and where it places your site. However many people do not know exactly what it takes to have a fast website.

Many think that a fast website involves nothing more than installing a WordPress speed plugin – perhaps tweaking some options and Bob’s your uncle.

However this is not always the case – and this particular client is a perfect example of how someone can have a very well designed, professional site – pay $10K+ for it – and yet still not have it optimised and fast.

The reason is because many times a client will test a web design’s company on their computers – which are normally extremely fast – and will not notice any speed issues – and will then sign off on the project – and there really isn’t a big incentive for the web design company to put any work into really optimizing the site for speed since the client isn’t even aware of the issue to ask about it.

Then the client could go to an SEO company – which can focus on various SEO factors like buying backlinks – but will not look at the underlying site structure as they (may) not be equipped to handle such technical undertakings.

Rather than creating a generic ‘How to make your WordPress site faster’ article – of which you can find many online – I instead wanted to show you a case study of a client who not only had a professionally created website – but also had a speed plugin installed – and how I optimized the site to its fullest potential – and allowed the site to perform to its greatest potential online.

Keep in mind – that this client’s site was not only professionally developed but also had a page speed plugin all ready – it was not “slow” per se.

This Case Study will go over the specific technical issues I had to fix – and may give you some ideas on how to squeeze some extra juice out of your site.

Good luck!

Let’s Start with The Results

Before we start let’s quickly look at the results that were achieved on this campaign (and when I say campaign I’m really only referring to the work done on site with speed fixes which will be outlined in this guide).

Please note the calculations used to come up with the total number in the title ($77,548.80) was done using my SEO Agency Audit method which you can find here.

First the overview graph

Here you can see a sharp increase in impressions and clicks – which were hovering around 35-60 clicks p/day.

To show you how you could quantify the results of this campaign on a financial level let’s look a bit deeper into the numbers. Below is the comparison traffic report of the 2 months before the traffic upswing and after the traffic upswing:

https://d3vv6lp55qjaqc.cloudfront.net/items/1N0U1a1t0f2q3M3e1t1b/Image%202019-07-08%20at%201.32.07%20PM.png?X-CloudApp-Visitor-Id=3150368&v=2b22f2ab
As you can see it’s 6.63 (6,630 clicks) vs. 2.72K clicks in the previous period. The impressions have pretty much quadrupled

The traffic only tells part of the story – luckily the client had tracked conversions through a long period of time on Analytics – so let’s look at how many enquiries were received over the same comparison period

https://d3vv6lp55qjaqc.cloudfront.net/items/3X2U0y0P452l2E3s453p/Image%202019-07-08%20at%201.03.47%20PM.png?X-CloudApp-Visitor-Id=3150368&v=d3d97cd7
Number of goal completions (contact form filled out) between the 2 periods

You can see a 38% difference – or an extra 157 leads in 2 months – which is significant. Keep in mind that this is a high ticket industry – with a starting price of $10,000 for the smallest surgical operation.

To quantify this further we can look at CPC on individual keywords. Let’s give a couple of examples and add those up:

https://d3vv6lp55qjaqc.cloudfront.net/items/440B2o2I400w0C2V1P3H/Image%202019-07-08%20at%201.29.13%20PM.png?X-CloudApp-Visitor-Id=3150368&v=2b22f2ab

Here we see hairline lowering surgery has gone from 1 click in 2 months to 83 clicks every 2 months. Taking this one example – and using the Keywords Everywhere Chrome plugin you can see the CPC (cost per click) for this keyword below:

https://d3vv6lp55qjaqc.cloudfront.net/items/3L0G241B233f2I0Q1N1b/Image%202019-07-08%20at%201.28.24%20PM.png?X-CloudApp-Visitor-Id=3150368&v=2b22f2ab

This comes out at $357.52 every 2 months – or $2,145.12 p/year – and that was just for one keyword change.

Note: to be fair I did some on page optimisation for that keyword above but here are ones where minimal changes were done:

https://d3vv6lp55qjaqc.cloudfront.net/items/132H2529430X0o3k3S2x/Image%202019-07-08%20at%201.29.41%20PM.png?X-CloudApp-Visitor-Id=3150368&v=2b22f2ab

You can make your own calculations on these keyword variations but taking ‘coolsculpting sydney’ at 55 additional clicks per 2 months at $5.80p/click comes to $1,914 p/year in additional traffic from that one keyword

In total taking all additional traffic into account and multiplying by the CPC the total additional traffic comes in at $16,156.01 over 5 months or $77,548.80 over 24 months (expecting these results to hold over that period).

The 5 months is stretched out over 24 months to find total traffic value – all though it could be consistent for more than the next 24 months.

Now I’d love to tell you that I achieved this with some voodoo magic behind the scenes work of powerful backlinks but actually all these results were achieved without a single backlink being sent to the site.

The two results above came from fixing one header (forehead reduction) and a broken link (coolsculpting) – but the thing that really put all this together is page speed.

The reality is most people have no idea on how to make their website faster – and this includes top of the line developers – so in this case study I will break down the road blocks that made me stumble – and what I learned.

Remember that this was not:

  • A poorly built website. It was a professionally built website which cost tens of thousands of dollars (this was not a ‘broken’ or ‘slow’ site) – nor was it essentially a bad web development project. The company that created this site did a good job.
  • There was all ready a speed plugin installed on the site (and yes – just because you have a speed plugin installed on your WordPress site doesn’t mean you will automatically see results like this)

So below I’ll go through the major challenges I faced – and that you will face too – when getting a site to optimal speed. This is a case study so the changes I made relate directly to this client – as well as the specific challenges I faced – I think learning from real examples and case studies is the best way to learn. So let’s get into it.

[su_box title=”Cons” style=”default” box_color=”#F73F43″ title_color=”#FFFFFF” radius=”0″]Keep in mind that if you don’t have the right plugin you will fall!.[/su_box]

HTTPS Redirects – The Silent Killer of Page Speed

I wanted to start with HTTPS redirects because it is one of the least discussed elements of making your site fast, the least understood (and slightly technical) and also one that has the potential to really screw up your site speed.

In fact – in all honesty – this really stumped me – and I actually had a few clients that had faster sites but were not getting under the 2 second load time that I was after – and I was racking my brains out to figure out why. The host couldn’t help – and WP Rocket support couldn’t help.

The hint came when I noticed that my staging site was loading much faster than the main site – and I noticed this and sent this news to my hosting cmpany – trying to figure out why. After all – they were pretty much identical in everything – except one – the staging site was loading fast and the main site had a 3 second load time.

Here is the screenshot I sent to my hosting company – trying to figure out why the 2nd resource (with the blue dot) was taking 3 seconds to load – and notice nothing else could load until that was finished). My staging site was identical except it didn’t have the 3 second delay. Also note it’s htps://myclientsite.com.au that I was typing in – notice the 3rd resource changes to https://www.myclientsite.com.au – I’ll get to this later.

The host couldn’t help me nor could WP Rocket support themselves – until finally I figured it out.

There was no redirect setup to take a user from https://myclientsite.com.au to https://www.myclientsite.com.au. So the server was trying to create this itself – and taking a long time (not sure why it was so hard to figure out).

But here are the steps to ensure that this doesn’t happen to you and you don’t rack your brains out like I did:

You do have an HTTPS certificate right?

Before we even start – I highly recommend – just for general SEO reasons to ensure that you have an SSL certificate.

If you go to your website on a Chrome browser and see this:

[ ]
If your site is not currently secured you should see this in the address bar in Chrome (the place where you type your web address in)

You need a certificate. Get in contact with your host – “Hey, can you guys set my site up with an SSL?” or you can

If your address bar looks like this (check at the top) – then feel free to proceed to the next step:

To www or not to www – that is the question

The first site wide decision you’ll have to make is if you want your site to be in the format of www or non www.

For example – your site could be either

https://yoursite.com.au or

https://www.yoursite.com.au

Take my site – kostak4.sg-host.com for example. If type in ‘kostak4.sg-host.com’ into the address bar – you’ll see it’ll change to my site URL:

In my case I made the site be www. throughout – however I could just as easily have made it https://headstudios.com.au – it doesn’t really matter. But you must make this fateful decision.

I have set the address for this URL in my WordPress Settings > General section. This is the place to choose how you want to display your site – once you know this you can move on to the next section.

Test site speed with waterfall and HTTPS Redirect (watch the blue dots)

[su_box title=”A quick note” style=”default” box_color=”#ffd400″ title_color=”#FFFFFF” radius=”0″]If your site URL is set to https:// without the www then technically you don’t need this section – as this only seems to happen for sites of mine that are https://www.[/su_box]

The first thing you want to do is find out if this is an issue that your site is currently experiencing. You can do this with either tools.pingdom.com or gtmetrix.com – in fact you could even do this with your own browser – but let’s use tools.pingdom.com for this example.

[image of tools pingdom]

Go over to tools.pingdom.com and type in your website URL without the www and without the http/https. So if your domain is https://www.lumbercaryard.com then type in lumbercaryard.com. This will force the site to create a redirect to the proper web address – and you can see how long this takes (if the server tries to do it itself – or if an htaccess file is setup).

You might also select the area you’re closest to your hosting server from the drop down but this isn’t that important.

[ image ]

Then wait for the site to load and once it does go down to the bottom and see the time it takes for the redirect to happen. Here is an example on my own site kostak4.sg-host.com:

A waterfall chart live from kostak4.sg-host.com – look at this – the redirect from http to https is fairly quick (first row) – but the redirect from https:// to https://www takes a whole second – this is slowing down our download time.

On

Wordfence and other Plugin HTAccess Rewriters

One day my client called me to let me know the site seemed to be loading slower than usual. I didn’t know why this would be happening – we hadn’t changed anything – on the server or on the files – for the site to be slowing down.

However the culprit was soon identified (thankfully the server knew what the issue was in this case) – it was the Wordfence plugin – and some code the plugin had added to the htaccess file that was slowing down the redirect.

Wordfence is a very popular security plugin – and I use it on my sites – however just be aware of the potential for this plugin to cause issues. If it’s the case try disabling it and removing the htaccess code and see if this fixes your speed issues.

The Worfence code will look like this:

# Wordfence WAF
<IfModule mod_php7.c>
	php_value auto_prepend_file '/wordfence-waf.php'
</IfModule>
<Files ".user.ini">
<IfModule mod_authz_core.c>
	Require all denied
</IfModule>
<IfModule !mod_authz_core.c>
	Order deny,allow
	Deny from all
</IfModule>
</Files>

# END Wordfence WAF

This makes the browser execute a file called wodfence-waf.php before the site starts – unlike other plugins who – once the cache is activated – don’t have access to any WordPress hooks and have al their actions hooked – Wordfence can be a drag. So just be aware of this. There are other plugins that can potentially cause issues so just look for any code that redirects to a .php file in the htacess file.

Firstly – you’ll want to see if this is an issue that your site is currently experiencing.

Your htaccess file is required to tell the server where to direct your URL’s.

If someone types in ‘yourwebsite.com’ and the address bar immediately changes it to ‘https://www.your…’ that is due to the work performed by the .htaccess file.

A big problem I faced was configuring the htaccess file and I will now tell you how I solved the problems and made the site lightning fast.

[su_box title=”A quick note” style=”default” box_color=”#ffd400″ title_color=”#FFFFFF” radius=”0″]This section of the guide assumes your weba ddress is https and that you have an SSL certificate installed. If you do not you can find out more info on how to install your SSL certificate here.[/su_box]

Speed Optimisation

Mobile Cache

One of the mistakes I made at first – which was slowing down the site significantly was not creating a mobile only cache with WP Rocket (please note from memory this is not enabled by default). The worst thing is – I wasn’t even aware of how much more heavy my mobile website was because of this.

Let me explain.

Whenever you come to a website – with either your phone, iPad or desktop computer – your device sends information to the server about what kind of device it is. The application (that is your website) – can then have access to that information when building your site.

To keep it simple and not make it too technical – there can be certain elements on your website – like a big video banner – that are probably un-necessary on a mobile device (nobody wants to go to a site on their mobile and see some video auto playing and draining their mobile data – leaving them fuming at you).

By creating two cached versions of the site – mobile and desktop – WP Rocket will check what device the user is on – and then serve the cached version of the site that corresponds to the device.

Let me show you an example of why this is so important.

In the video above I am on the desktop site – however the desktop site is still responsive. When I make the browser smaller it looks exactly like the mobile site – but the big video you see at the top still loads in the background – it’s just not visible.

Below you can see the ‘Network’ Dev Tools from Chrome – which tells you which elements are loading in which order and how long they take – what I discovered was that the mobile site was still loading that big 8.8MB video file.

Every.

Single.

Time.

The video loads in the background and sucks up 8MB – not good for Google crawlers – and impossible to pick up. Moral of the story – have a separate mobile cache!

In our case what was happening was that after WP Rocket was activated the mobile site actually started loading slower.

This is what was happening and dragging down the mobile download speeds (Google looks very carefully at how big your mobile site is) – so I created a separate cache for mobile to fix this issue.

Conditional Loading

One way to save on mobile speed – (by the way – I should mention that Google is switching all sites to mobile first indexing – which basically means you better have your mobile site fast otherwise good bye rankings) – is conditional loading.

This will require a slight bit of programming – but it’s well worth it.

You see – most sites will hide elements on mobile responsive sites that show on the desktop site – but will still load those elements. In other words – just because you don’t see a particular image on the mobile site – does not mean it’s being loaded.

There are many sites that serve the same site regardless of what device the user is on – and unfortunately there’s no front end way I’ve found to not load images on mobile devices when they’re not required – lucky for you I’m a WordPress developer – and can show you how to do that now.

I introduce to you the results of my research – and it is a function called [….].

But let’s take a practical example. Here is my client site’s drop down:

Note the images on the drop down – in total there are 30 images like this spread out across the top menu (for example there are 6 in ‘Procedures’ as listed here, 6 in About Us, 5 in Medispa, 5 in Patient Info etc. So that’s a lot of images!

Now as you can see image above there are 6 images being loaded – even though they’re not visible on the mobile version of the site menu.

This is the same drop down on the mobile site – note that even though on the mobile version these images are not visible – they are still being loaded in the backend. How much data do you think 30 images will suck up? All that for images that aren’t even required – and believe me no speed plugin is going to fix this issue.

You may conclude that these images are not being loaded but alas you would be wrong – there is a whole bunch of elements like this that are loaded on many sites and clog up servers.

So let’s get that speed edge over our competitors.

You are looking for 2 functions (and just a heads up this may get a bit technical – you may need a developer like me to implement) – preg_match and the $_SERVER variable.

Note: there are tools like Elementor that will allow you to hide elements on mobile screen with options – be aware that these tools do not remove the said item from the loading queue. This is the only way I could find that does this – and saves a bunch of date.

And here is how to hide images you don’t need:

Introducing the isMobile() function to your theme

In the source code of your website – in the location where your template is located – you need to edit a file called functions.php – don’t worry about all the other stuff on that file – just add the following code to the bottom:

function isMobileDevice() {
    $useragent=$_SERVER['HTTP_USER_AGENT'];
if(!preg_match('/(android|bb\d+|meego).+mobile|avantgo|bada\/|blackberry|blazer|compal|elaine|fennec|hiptop|iemobile|ip(hone|od)|iris|kindle|lge |maemo|midp|mmp|netfront|opera m(ob|in)i|palm( os)?|phone|p(ixi|re)\/|plucker|pocket|psp|series(4|6)0|symbian|treo|up\.(browser|link)|vodafone|wap|windows (ce|phone)|xda|xiino/i',$useragent)||preg_match('/1207|6310|6590|3gso|4thp|50[1-6]i|770s|802s|a wa|abac|ac(er|oo|s\-)|ai(ko|rn)|al(av|ca|co)|amoi|an(ex|ny|yw)|aptu|ar(ch|go)|as(te|us)|attw|au(di|\-m|r |s )|avan|be(ck|ll|nq)|bi(lb|rd)|bl(ac|az)|br(e|v)w|bumb|bw\-(n|u)|c55\/|capi|ccwa|cdm\-|cell|chtm|cldc|cmd\-|co(mp|nd)|craw|da(it|ll|ng)|dbte|dc\-s|devi|dica|dmob|do(c|p)o|ds(12|\-d)|el(49|ai)|em(l2|ul)|er(ic|k0)|esl8|ez([4-7]0|os|wa|ze)|fetc|fly(\-|_)|g1 u|g560|gene|gf\-5|g\-mo|go(\.w|od)|gr(ad|un)|haie|hcit|hd\-(m|p|t)|hei\-|hi(pt|ta)|hp( i|ip)|hs\-c|ht(c(\-| |_|a|g|p|s|t)|tp)|hu(aw|tc)|i\-(20|go|ma)|i230|iac( |\-|\/)|ibro|idea|ig01|ikom|im1k|inno|ipaq|iris|ja(t|v)a|jbro|jemu|jigs|kddi|keji|kgt( |\/)|klon|kpt |kwc\-|kyo(c|k)|le(no|xi)|lg( g|\/(k|l|u)|50|54|\-[a-w])|libw|lynx|m1\-w|m3ga|m50\/|ma(te|ui|xo)|mc(01|21|ca)|m\-cr|me(rc|ri)|mi(o8|oa|ts)|mmef|mo(01|02|bi|de|do|t(\-| |o|v)|zz)|mt(50|p1|v )|mwbp|mywa|n10[0-2]|n20[2-3]|n30(0|2)|n50(0|2|5)|n7(0(0|1)|10)|ne((c|m)\-|on|tf|wf|wg|wt)|nok(6|i)|nzph|o2im|op(ti|wv)|oran|owg1|p800|pan(a|d|t)|pdxg|pg(13|\-([1-8]|c))|phil|pire|pl(ay|uc)|pn\-2|po(ck|rt|se)|prox|psio|pt\-g|qa\-a|qc(07|12|21|32|60|\-[2-7]|i\-)|qtek|r380|r600|raks|rim9|ro(ve|zo)|s55\/|sa(ge|ma|mm|ms|ny|va)|sc(01|h\-|oo|p\-)|sdk\/|se(c(\-|0|1)|47|mc|nd|ri)|sgh\-|shar|sie(\-|m)|sk\-0|sl(45|id)|sm(al|ar|b3|it|t5)|so(ft|ny)|sp(01|h\-|v\-|v )|sy(01|mb)|t2(18|50)|t6(00|10|18)|ta(gt|lk)|tcl\-|tdg\-|tel(i|m)|tim\-|t\-mo|to(pl|sh)|ts(70|m\-|m3|m5)|tx\-9|up(\.b|g1|si)|utst|v400|v750|veri|vi(rg|te)|vk(40|5[0-3]|\-v)|vm40|voda|vulc|vx(52|53|60|61|70|80|81|83|85|98)|w3c(\-| )|webc|whit|wi(g |nc|nw)|wmlb|wonu|x700|yas\-|your|zeto|zte\-/i',substr($useragent,0,4))) {
    return true; } else { 
        
        return false; }
}

What this code will do is allow us to quickly call it by using isMobile() anywhere on the site – and then choose what we want to display (or not display). Let me show you a live example implemented from the client’s website:

if(isMobileDevice()) {
$title_enhance = '<span class="fusion-megamenu-icon"><img src="' . $this->menu_megamenu_thumbnail . '"></span>';
//echo "You are on a mobile";
} else { $title_enhance = ''; }

That’s all I added! After that change has been implemented here is how the menu looks now (using the Chrome User Agent Switcher):

This is the website viewed using Google Chrome User Agent Switcher (as mobile) – notice the images are now missing – they will be visible if switched to

The plugin that I am using here is ‘User-Agent Switcher for Chrome‘ – this allows you to fake who you are to the website – making the website believe you are a mobile user when really you are on the desktop. It’s helpful to see just how a website will react when it thinks you are on mobile – during development and testing.

Summary

That is all there is to it. Using these 4 steps above I was able to increase the traffic to my plastic surgery client by $77,548.80.

Speed is a considerable ranking factor for Google – and while this client had a professional and well put together website there were a few speed tweaks that were required to make it look perfect in the eyes of Google.

If you suspect your site may be slow follow the steps and you have tried the traditional page speed advice you may want to try the tips above and you should see ranking and traffic increases especially on a well trafficked site.

Is Your SEO Agency Measuring Up? How to Audit Your SEO Agency’s Efforts with Google Search Console

Recently I had to create an update for a client – and I wanted to put together a way to show the client the impact that my SEO had done for them. I had all ready been working with them for 5 months and you know – you want to show the client exactly what kind of ROI their SEO results are getting.

It was kind of a slow month as far as more traffic coming through goes – so I decided to compare the previous 5 months that I had worked with the client vs. the 5 months before that (before I started working with them).

No – Rankings Don’t Matter

This is the catch cry of all SEO’s – I see their posts on Facebook (as I am friends with a lot of them) – it’s usually a sheet that has a list of keywords and their position from the previous month to the current month.

So if you have a keyword like ‘bike repairs new york’ and you were position 9 last month and this month you are position 7 then you’ve gone up by 2 points.

However this actually means a lot less than you think it means. And here’s why.

Recently I optimised a keyword for my client who sells eco friendly toothbrushes – I got him on the first page – and I mean from nowhere. Now that may sound good but do you know what the CPC is?

It’s only $1.

Now $1 is still higher than other keywords but a lot of time an SEO person can share keywords which mean nothing – because the value of that keywords is what’s important.

Let’s say you optimise for a keyword that costs 10 cents per click – and has a volume of 50 searches per month. You may be getting 10 clicks from this keyword per month but it ends up being $1 that you’ve actually saved.

The SEO person looks good and you may feel good that some keyword that you thought was important is rising – but it really doesn’t mean anything and is not worth much.

No, Traffic Is Not Important

Well then why not go by traffic? If you are getting an extra 500 visitors per month – that’s great right?

The problem is many SEO’s don’t really compare their services to simply BUYING traffic.

Many people that start SEO don’t do AdWords – they’ve heard good things about organic optimisation but they don’t get the benefit of comparing.

So let’s say you join an SEO company that charges you $1,000p/m – they do SEO for you and you are getting an extra 500 visitors per month. That may sound great – and the keywords may be in your area – but how much is that traffic worth on the free market if you purchased it.

For some niches (industries) the cost per click is very low – simply because the price of the item being sold is low. So for my eco toothbrush company client – the cost per click is quite low – and this has to be factored in.

An example – let’s say I get my eco toothbrush client an extra 200 clicks per month – that sounds great – it’s more traffic – right? But the cost of those extra 200 clicks comes in at $200p/m – the SEO traffic has to be compared to the cost of the free market.

So that doesn’t work.

So how do we compare?

Hard Dollar ROI Is the Only Thing That Matters

The only thing that matters – as far as the decision maker being able to see if SEO is worth it – is hard dollar ROI return.

Here’s how it works – how much would we be spending to purchase this traffic had we not gone with SEO.

That’s it.

This is the only metric that matters.

We are getting this much additional traffic – and this would have cost $x dollars had we purchased it.

This moves SEO from the land of airy fairy metrics that no one cares about to the only metric that matters.

But Would You Just Look at my Cool Graphs!

Many SEO companies will send through some big, nice, colorful report with their branding on it – it’s probably going to raise more questions than it answers – but it will be optimised to look good.

This graph might mention various keywords that are rising in search – it might mention CTR.

It can mention Bounce rates.

All kinds of metrics that while great – hide the one metric that really matters.

And that is DOLLAR ROI.

The other issue with these reports (which I’ll get into later) – is the source of those reports. Whenever data is presented to you – you have to ask where that data came from.

Maybe I’m a little bit more traditional but I don’t trust data unless it comes directly from Google – there are many third party products out there and I just don’t know about an SEO company saying

“Well this is our software that gets data from god knows where and it says that things are going well.”

So not only are you getting some random metrics that raise a bunch of questions – but the data that those metrics are coming from can raise some questions.

So – how do we get the one metric that matters ($ ROI) – and make sure that we get it right from the source.

If It Ain’t Coming From Google Then I Ain’t Trust It

Sorry – that was a hip hop lyric reference.

In this article you’ll see Google making one thing clear -https://www.seroundtable.com/google-search-console-reports-accurate-26027.html – the data it gives you for free is as accurate as it gets – and this data comes from Google Search Console – which any webmaster has access to.

Note: by the way if you are with an SEO company and you don’t have access to Google Search Console then think twice about what you’re doing. You should be given user-read access to your Google Search Console account – as this is where Google will tell you just how good your organic trafic/results are doing.

So the first thing we have to agree on – is that we should get our base data from Google Search Console – or in other words Google itself.

But how do we use Google Search Console to

[traffic uptake]

I could say “Well last month you had this many visitors and this month you had this many visitors”

So, How Do We Find Out the Only Number ($ ROI) That Matters

Firstly – you shouldn’t go to your SEO company and ask them for a $ ROI – if possible you should be able to determine this for yourself. In other words you should always be able to validate the data yourself about how your SEO is doing – if you do ask your SEO company to provide it make sure you ask them to explain how they came to that number.

In order to do this yourself (and by the way doing this yourself will take literally 10 minutes) here is what you will need.

What You Will Need to Determine ROI

Below are the following things you will neeed to determine ROI:

1. Access to Google Search Console

You should have access to Google Search Console – this is the central hub where Google sends you all the data it has on your website. It is arguably the most accurate representation of how your website is doing in organic search results.

If your webmaster or SEO person setup a Google Search Console account – they should have granted you access. If not you should send an email requesting them to grant you access.

Hi SEO Man,
Can you please grant the following email access to our Google Search Console?
Thanks

If your SEO company refuses to grant you access to Google Search Console or even worse – has not set up an account for you then run. If an account hasn’t been selected you can follow the guide here to set it up for yourself – going into details on how to do it is outside the scope of this blog.

Warning: Google Search Console data only goes back 16 months. So if you have had an SEO company for the last 16 months+ you are fresh out of luck because you won’t have any data to compare to.

Double Warning: make sure that you are getting data from the ‘Domain Property’ in Google Search Console and not just a subdomain. You can see below for my own website kostak4.sg-host.com I have 2 subdomains and a Domain Property (which Google Search Console clearly outlines) – use that one. If you don’t see ‘Domain Property’ as per screenshot below then follow the instructions here to setup a new Domain Property.

Make sure you select Domain Property for your domain – and not the others. It’ll clearly say ‘Domain Property’ underneath – if you don’t see that for your site you can create it.

2. Microsoft Excel (or Google Sheets)

In this example I use Microsoft Excel – you can download it on a free trial. If you absolutely cannot use Microsoft Excel – then you can use Google Sheets or really any spreadsheet software that you have access to.

Steps to Get Your SEO ROI

Step 1: Create a Comparison Performance Graph with Google Search Console

To start you’ll need to login to your Google Search Console account and click on ‘Performance’ in the left hand column – then from there click on the ‘Date: Last 3 Months’ filter at the top and then click the ‘Compare’ tab (by the way I will provide a video guide below on how to do this so don’t worry if it’s a bit confusing).

From here – if you have been working with your SEO company for 3/6 months exactly you can just select ‘Compare last 3 months to previous period’ – however if it’s an odd range like for example you’ve engaged them 120 days ago or so you would need to scroll down and select ‘Custom’.

In the example below I started working with my client on the 9th March, 2019 – since it’s the 23rd July, 2019 now – if I calculate that it comes to about 135 days roughly in total (4 months * 30 + another 15 days from 9 to 23) – I’m not the best with maths and I’m using rough figures here.

So then I back track 135 days from the day I started – or 4 months and 15 days so let’s do December, 15th (4 months from March 8th is November 8 – then minus 15 days is 23rd of October).

Note: in the above exmaples I’m just assuming every month has 30 days to make it easier.

So our final comparison period is:

9th March, 2019 – 23rd July, 2019
compared to
23rd October, 2018 – 8th March, 2019

Note: one thing I left out in those calculations is that Google Search Console only goes up to 3 days ago as the most recent date for its data (so you have to wait 3 days to get today’s data) – but it’ll come out of the wash in the next step if necessary.

Let’s see a video on how this is done on my end

Note: in the video above you can see after I do the comparison that I have an additional 3 days that are not being compared – to be fair to the SEO efforts you are auditing you want the same amount of days in between. I won’t go into this as this is just doing the astral calculations – after doing the video above I adjusted the date range to be 3 days in front so 26th October, 2018 instead of 23rd so we’re working with the same number of days.

Step 2: Download the Comparison Data into Excel

For this step you’ll need a copy of Excel open and you simply need to copy/paste the table data underneath the comparison graph that we created in the step above.

You’ll need to ensure that you select the maximum amount of rows per page and then drag from the ‘Query’ column all the way to the bottom and then press Ctrl+C or whatever your copy command is on your computer model – and then go into Excel and paste in the top left hand corner – if you do everything correctly you should have some very valuable data in your Excel spreadsheet.

If you have a long keyword list you’ll need to go to the next page.

Step 3: Create a ‘CPC Savings’ Column and Calculate the Total Value of the Extra Traffic

For this step you’ll need to make an extra column – in this case I’ve called it CPC Savings – and you want to create a calculation in this column. What this calculation will do is say what the dollar amount of the extra traffic is worth.

Since during our export from Google Search Console we have the column for ‘CPC’ – or how much each keyword costs per click – as well as the clicks for that keyword for our 2 comparison periods (before and after SEO efforts started) – we create a formula similar to this:

=(F3-G3)*C3

Now this is assuming that
F3 – the clicks for the particular row’s keyword done during the SEO period
G3 – refers to clicks made for keyword in the period where SEO had not been done
C3 – the cost per click for that keyword

The idea is that there should be more clicks in the SEO period then before – we simply find out how much more clicks e.g. 20 more clicks and then times that by the cost per click.

So if you have an extra 20 clicks at $5 per click – then that is $100 worth of extra traffic generated on that keyword.

The video at the start of this section will clear up any questions you may have – otherwise just contact me in the contact box in the bottom left and I’ll try and assist you best I can.

Finally we repeat the calcualtions across all the keyword rows (by double clicking in the bottom right corner of the cell where you wrote the calcuation when you see a black cross).

Finally we create a sum row at the bottom which adds up all the savings (or in some cases losses) from this campaign – and this final number is how much money was saved over that time period.

In my case – in the example video above you can see it was $16,056.01 over the 5 month period.

Note: keep in mind your SEO company doesn’t need to generate enough traffic to cover its costs for the month because the traffic is ongoing. So if you work with your SEO company for 3 months at a $1,000 retainer – and they generate an extra $1,000 worth of traffic in that time period – you haven’t lost $2,000 because that traffic (should) continue to come into your site for an extended time – I look at 1-2 years.

Step 4: Evaluate the Results

Once you have your final figure down from Step 3 it’s time to evaluate the results that have come through. How you make this decision is going to be based on a number of factors – the biggest one being how much you are paying your SEO agency per month.

SEO starts from $590p/m to $10,000p/m. The amount that you spend must always be compared with how much you get back in ROI. To be fair to the SEO agency you are working with you could look at their SEO efforts in the context of 2 years.

Note: every SEO agency is different in the way it achieves its results – some do a lot of black hat strategies that may not last once the next Google update hits or their efforts are discovered by Google – so the extra traffic you see may be only temporary and may not last 2 years – this calculation is done with the assumption that your SEO agency is fairly competent and that the traffic increase will last.

Let’s use the above example for our sample calculation:

  1. Take note of the total CPC savings and divide by the amount of months of the range taken. So in our example it’s $16,156 / 5 months = $3,231.20p/m of additional traffic.
  2. Times the average monthly traffic by 24 months. So $3,231.20 * 24 = $77,548.80.

Most of the time the answer will be apparent. In this particular case you can see there’s $77,548.80 generated over 24 months. If the total traffic generated per month is more than the SEO cost than it is a solid investment.

But really you don’t need complex calculations – in fact you could make the argument that if the additional monthly traffic generated from SEO is worth more than the monthly SEO fee then it is a good investment overall as long as that traffic remains.

Good luck and feel free to ask any questions you have – also I offer a free SEO Agency Audit if that interests you – just get in contact with me in the chat box below.

CASE STUDY: Converting a Volcanic Site to WordPress + Integrating with Broadbean

The Challenge

Recently a client came to me in the recruitment industry who wanted to switch providers from Volcanic to WordPress. If you are in teh recruitment industry and were considering a website you would have most likely heard of Volcanic (in fact you probably clicked from an AdWords ad).

In this case study I wanted to give an overview of the challenges and pain points of the client on the Volcanic system – and the specific way I addressed these by recreating the site in WordPress.

It may be of interest to you if you currently use Volcanic and are considering other options – and how such a project was done.

[su_box title=”Note” style=”default” box_color=”#ffd400″ title_color=”#FFFFFF” radius=”0″]This case study is not 100% complete and I am only trialing this as an ad on AdWords – so fair warning it’s a little rough around the edges.[/su_box]

Monthly SaaS Fee vs. Development

When my client started with Volcanic they were paying a certain monthly fee. However this monthly fee – a lot of it anyway – was eaten up by the platform fee. In other words the client wasn’t really paying every month for development services – they were just paying to have access to the platform.

Now when I say platform – Volcanic is a CMS platform just like WordPress – however it was custom built from the ground up to work as a recruitment type CMS website. Which is like a WordPress CMS with some job recruitment plugins.

Tied to One Provider

When you use a CMS platform developed by a single web development company – you are tied to that one provider – whether it be an agency or a specialist recruitment company like Volcanic.

This might not seem like a bad deal when you are first presented with the features the CMS could do – in fact you could be shown a graph that says “Hey, this is everything our CMS can do that WordPress can’t”.

However being tied to one provider also has a whole host of negatives – and these include:

  • The provider is less likely to take care of you since you are stuck within their ecosystem
  • The switching cost is high – since no one else knows how to use this CMS besides the developer
  • If you do switch – even if you keep the CMS platform the developer has built – you can pretty much count out doing any kind of custom development work

In my client’s case they were paying $x per month for Volcanic – however I suspect that amount included minimum custom development – the fee in essence was to have access to the Volcanic CMS Platform.

The Solution

After speaking with the client and going over some pain points – I proposed a solution where I would convert the site to WordPress and the client would continue paying a monthly fee to myself.

The great thing about this for the client was that not only were they paying less per month then they would be were they to stay with Volcanic – but that monthly fee could then be used towards my services including:

  • Custom development and adding new features
  • SEO and building organic traffic

This was great value for the client – since the client was going on a monthly plan with me rather than a one-off payment there would be minimal additional expense (other than the first 3 months of that plan being used to convert the current site and take it live).

Basically this was a web dev and SEO solution. But this case study deals with just the aspects of converting the site to WordPress.

The Project

Maintaining Permalink Structure

One of the most common and egregious mistakes WordPress developers make when converting a site to WordPress is not maintaining the permalink structure and losing Google rankings and organic traffic.

Let me give you an example.

Let’s say you have a URL for your services page like so:

https://www.yoursite.com.au/recruitment-services

You convert your site to WordPress and put it live but the new URL for the page is:

https://www.yoursite.com.au/services

Now – any links pointing to that page from other sites will not be counted by Google – not only that but if Google has that page in its index – and it’s now being returned as 404 Not Found – this will lead to a higher bounce rate and – well let’s just say if someone doesn’t know how to convert your site to maintain (and maybe even increase) your Google rankings/traffic then that is a big problem – and it defeats the whole proccess.

After all what’s the point of saving money in IT costs by switching to WordPress only to lose your Google rankings right?

As part of my development I replicated every permalink and meta description on the site to match their current page structure – also I optimised/tweaked their WordPress page speed so it was as fast – if not faster than what it was on Volcanic.

Speed Increase

While the Volcanic site was loading quite quickly on browsers – it had a terrible PageSpeed score from GTMetrix (F). No one really knows how Google ranks sites – but we know that page speed is a ranking factor. It’s also a fair assumption that if your PageSpeed score is F that this would mean the Google crawlers are not going to be too happy with you – and you would give ground to your competitors whose sites are optimised.

As part of the SEO part of the project I tinkered and improved the page speed significantly

Side by side comparison of speed optimisation – my version on the left
[su_box title=”Note” style=”default” box_color=”#ffd400″ title_color=”#FFFFFF” radius=”0″]Page speed optimisation is an on-going proccess – and there are still issues I am looking in to get the PageSpeed higher. But also keep in mind that GTMetrix scores are a guide – and you don’t need 100% PageSpeed score to rank high in Google – but you definately don’t want an F score either. [/su_box]

Broadbean Integration with WP Job Manager

More information coming soon – if you would like the full case study sent to you please fill out the form below:

Increasing Conversion by 400% using an Elementor Landing Page

In this blog post i wanted to talk about a recent Facebook Ad Campaign I did for a Guesthouse – and how I used Elementor to update a landing page and increase conversions by 500%. This may seem difficult to believe but I wanted to clarify a few things. 

Firstly when I speak conversion rate I’m talking about the following metrics:

  • Number of people who engaged with the booking app
  • Number of people who initiated a checkout (which is actually putting sample dates in the booking app to see availability)

The booking app that was used is CheckFront – all though the actual booking app that is used – if you are promoting a guesthouse/hotel/hostel is irrelevant – as long as it is built to be integrated with Facebook Events.

By having the booking app that you use be integrated with Facebook you can then track the results by seeing how many interactions happen for each user and being able to track what kind of results happen from modifying certain aspects of the page using split testing.

In this case let’s use an example of the old landing page and the new landing page that was built with Elementor to get it all out of the way first:

Here is the old landing page:

And here is the new landing page created with Elementor that got a 400% positive response rate:

By the way interestingly enough the first time I ran a split test between the old landing page and the new landing page the CheckFront app had broken and was not registering Events – so I couldn’t track the results too well – however after getting in contact with them and informing them of the issue they promptly fixed it.

Below are the results for the split test that was ran on Facebook Ads:

Please note ‘Content Views’ refers to times users engaged with the booking widget – it’s a different metric to Landing Page Views

Now keep in mind a couple of things – the first being that there are less impressions/click on the old landing page than the new (the targeting and ad copy are exactly the same for the two ad sets – it’s only the destination page that is different) – the reason for this is because the old landing page ad set started delivering AFTER the new landing page was launched – probably because I didn’t set some option correctly leading it to not be approved.

The other issue is that the new landing page was performing so well I didn’t see a need to continue the old landing page campaign to completion of its budget.

There were 111 clicks on the new landing page and 58 clicks on the old landing page. As you can see even if you double the results of the old landing page the new landing page outperforms it by far.

For example 4 Website Content Views (this is someone engaging with the booking app) – doubled would make 8 Website Content Views – compared to 35 Website Content Views on the new landing page. At 400% increase from 8 that would still be 32 – less than the 35.

As far as the Checkouts Initiated go – you can see we have 5 vs. 0 on the old landing page – in the past when I ran the old landing page campaign my results were pretty dismal for add to carts – having 5 is very good. Basically there is about a 12% conversion of people who engage with the booking app – and those that actually begin the checkout.

You can check out both landing pages using the link below:

http://bit.ly/2Qa7XVE – Old Landing Page

http://bit.ly/2DDTcnn – New Landing Page

So in saying that I’ll make some comments about what worked for me and what I learned from this conversion increase that you may be able to apply to yourself:

Have a Straight Anchor Call to Action

For guest houses/hostels especially – if you have a booking page – allow the user to immediately click and go to the booking section of that page instead of having to scroll down. You will find on the new landing page I have a button that says ‘Book Now’ I made this an Anchor link that takes the user past all the content and immediately to the booking section.

This may not work for all industries – but many times people are going to want to check the prices right away – why force them to go through a bunch of copy? It’s only going to annoy them – on the internet you can’t really hide the price – for commodity based products allowing users to go straight to purchase would be the go.

An Image is Worth a Thousand Words

This is not something I need to tell most people – but make sure your images work and that you have plenty. In the old landing page the images would consistently break – there were times when I would click on the images and they wouldn’t come up – or I would click on the images and the whole page would have to refresh to display that image.

The great thing about Elementor is adding an image gallery is easy – and you will notice on the new landing page I have image galleries for cabins and rooms.

Also I’ve added images for features/benefits of the accommodation stay – along with images for those:

Remove Un-necessary content

In the old landing page you’ll notice that there is a bar on the right with some unrelated content – this was taking up valuable real estate which could have been used to push the product and so I removed this.

Remove header real estate

In the old landing page the header was quite large – as you can see:

In the new landing page I had created a much smaller header. It could be argued I could have done away with the header completely but I still wanted users to explore the rest of the site. If you check the site now you’ll notice that the only page that has the new header is the Accommodation page – so I basically implemented my Elementor page on the Accommodation page only.


In later blog posts I might share the ad copy and the video I created for this ad – but hopefully this is of value to people. I have attempted to be as transparent as possible – and I believe real case studies rather than theory pieces is the best way to learn and get insight.

Peace Y

Getting Paid Online Using Stripe, WooCommerce and a Good Theme (and those pesky SSL certificates)

I’m very excited to be writing this blog post because it deals with one of the most important – top line activities for any business operating online – getting paid. If you’re not getting paid, and staying in the black – or at least looking to do so – you may as well pack up and go home.

In this blog I’ll be covering the technical issues in relation to getting paid – if you are opening an online store or selling a single product and looking to integrate a payment gateway read on – this will be a technical breakdown of how I setup payment gateways for my clients to get paid – and what you need to be aware of. 

So without further ado, let’s get started:

1) Understanding the Simple Complexities of SSL Certificates

In order to get paid online you’ll need an SSL certificate. This is just some piece of software that gets put on your site that encrypts the data between you and the payment gateway software that you’ll be using.

Rest assured that while this may seem technical (where do I get an SSL certificate, which SSL certificate is the best to get) – the easy answer is this – you can get a basic SSL certificate for free – easy peezy. 

For example – I have a number of staging sites – and I can just get in contact with my hosting company through their online chat and have them put an SSL certificate on a client’s site. It takes 1 minute – alternatively there is an option in cPanel called something like ‘Let’s encrypt’ where you can do this on your own without speaking to you rhost. And the SSL certificate is free.

Don’t let anyone convince you that you need to pay for an SSL certificate – there’s absolutely no need – and SSL companies have been pushing this for a long time – the idea that “customers won’t trust you” if you have a free SSL certificate. 

However let me show you something.

Below is me checking the SSL certificate of Amazon.com (a pretty reputable company):

And here is me checking the security certificate of a client’s site using a free SSL certificate provided by my hosting company:

Notice that they look exactly the same to the client. So don’t stress about SSL certificates or which one to get! Just get a free one provided by your hosting provider. Believe me if you’re going to fail to make sales it’s not going to be because of your SSL certificate. I’ve never heard someone say “You know we launched our product but… if only we had a reputable SSL certificate.” Lol – no that’s never happened. 

2) Make sure you are not linking to any external images or content

This is just a basic web development tenent you should be following anyway – but if you are linking to any external images on your website then the SSL certificate won’t break – or won’t authenticate your site – and your payment gateway will not work. 

This is a pretty easy fix – in fact I had this issue with a site I was working on and my hosting company fixed this issue for me in 2 minutes. If you install your SSL certificate and see this:

It means your connection is not secure due to external images. If you do have this issue simply go to this URL:

Why No Padlock

And enter in your URL – and you will get a report specifying exactly what code is breaking the SSL certificate:

And that’s it! That’s the biggest issue that can come up when you install your SSL certificate.

2) Setting up an online store using WooCommerce

No matter if you are selling 1 item on your website – or 100 items – it’s still considered an e-commerce store. Luckily these days setting up an online store is easy with WordPress and there are many frameworks that have all the checkout functionalities you’ll need to make it all work. 

Just ask yourself what you want to sell and try to find a framework that closely does what you need. 

The best advice I can give is to take a framework that has done 90% of what you need – and modify the last 10% to your needs. Do NOT create a checkout/e-commerce/online store system from scratch. 

Believe me when i say you’re not the first person to do the type of shop you’re doing online – and there are lots of frameworks that all ready do what you need. 

Here is a sample framework for a construction company that may sell certain products/services online:

Construction Theme Example

This all ready comes WooCommerce ready and everything is ready to go at the click of a button – just install it on your hosting provider and you’re ready to go.

3) Setting up a payment gateway

There are many payment gateways to choose from – PayPal, Stripe and Square are the most popular ones at the moment – but there are many others to choose from. As long as the payment gateway you choose is integrated with WooCommerce that’s the most important thing. 

If you’re not sure if it does go to 

WooCommerce Extension Library

And type in your payment gateway – e.g. Stripe

Also note that the extension is free – and many times the developer of the integration software will actually help you. For example Automaticc – the guy who built the Stripe WooCommerce integration have been helpful in replying to issues that I was having. 

If they are unresponsive many times you’ll have to buy their software or something in order to get that email support.

Once you install the plugin it’ll be available in the WooCommerce in the WooCommerce -> Settings -> Payments tab

When you sign up with your payment gateway they’ll ask you for a bunch of details (your bank account details) – to get everything working. There’s three things you’ll need to be aware of in all these integrations:

Test Keys / Live Keys

Your payment gateway will have some Test/Live keys – they are like API keys – that you will need to insert into your settings page for that payment plugin. For example once you sign up with Stripe you can find them at this URL:

Click here to get your Stripe API key

Simply copy them from here and paste them into your site URL below (just replace yourdomain.com with your domain):

https://yourdomain.com/wp-admin/admin.php?page=wc-settings&tab=checkout§ion=stripe

Couldn’t be easier than that – you can start planning your site with a test key and enter fake credit card details until everything works and then switch to live to make some test purchases with a real credit card to make sure payments are being received correctly if that’s important for you.


That’s it – once this is done you’ll be ready to start receiving money online. 

Hopefully this has taken out some of the complexities of receiving payments online and cleared some things up for you.

Good luck and remember – there are so many complexities to anything you want to do (especially when it comes to the online space) – but the most important thing is taking action.

Why Visual Composer is Worse Than Elementor and Why Theme Frameworks Need to Start Implementing It

For the past 3 months I have been eagerly studying Elementor – the new page builder for WordPress (well not technically new – it has been around for over a year – but it’s the newest WordPress page builder plugin – and in my opinion the best).

As I was using the page builder it really showed me how professional website layouts can be created in a matter of hours. This is beneficial to both clients and myself – and allows any type of promotional campaign to be launched very quickly – the only thing where effort needs to be put into is the actual content of the layout, image choices etc. rather than the technical aspect.

While I was very happy with my knowledge of Elementor – there is one problem. 

Unfortunately most WordPress frameworks/themes are still using Visual Composer Page Builder (a different plugin to Elementor) – as their standard page building software. 

Recently I was building a site where I attempted to use Elementor and it crashed some functionality of the site – forcing me to recreate the layout in Visual Composer – so I thought it would be a good opportunity to showcase the differences between the two – and show you just how great Elementor is – and yet also make you aware that should you go with a framework – why understanding what Visual Builder the framework comes with is very important. 

So let’s start with checking framework page builders – and what that means (don’t get scared of all these technical words – it’ll make sense soon).

If you go to ThemeForest – which is one of my go-to places to find themes – but more importantly frameworks – let’s – for the purpose of this – imagine you are building a directory site for coffee shops in Australia – and what their facilities are for digital nomads (this is a bit of a selfish idea – as it’s something I would be interested in – since I need a powerpoint until I replace my Macbook battery, and good WiFi would be preferrable – as well as a generally friendly atmosphere when it comes to being able to sit with my laptop and not be bothered etc.) So we would build a site like ‘Digital Nomad Coffee Directory’. 

If we find a framework to start working on like this one for example: https://themeforest.net/item/urbango-directory-and-listing-wordpress-theme/22712624?s_rank=2 (P.S. I wouldn’t personally recommend this theme for other reasons – like the fact that it has no reviews left – but we are just using this as an example)

If you look through the sales page it looks very cool – and the layouts look great – until that is – you have to modify them.

At the bottom of the page you’ll find what you’re looking for:

As you can see the plugin comes with Visual Composer – which is the case for the majority of theme frameworks. So – what does this mean to you? And why should you care?

Well just to give you an open book of how it will look when you actually decide to change the layout of this page – let me show you two identical layouts for a client – and how it looks like to edit them in the backend.

Here is me editing a client layout using Elementor:

As you can see – I (or you) simply click on an element that you want to edit and then make the changes – and afterwards everything is visible exactly how it would appear on the front end. This is what makes Elementor so revolutionary! 

Now let’s compare that to Visual Composer – and how editing the same page would look like using the Visual Composer plugin:

As you can see in the video above – I do the exact same thing that I did with Elementor – but do you see how much more un-intuitive it is? Now instead of clicking on some text and editing it – I have to open up a new section – and when it comes to adding a visual element like an icon to the button – I don’t even know what it will look like without previewing the page – so every adjustment I make – I have to then update the page and then preview it (which takes 10-15 seconds each time – instead of being instantenous).

So now – hopefully – you have an idea of the differences between Visual Composer and Elementor – so keep this in mind. Especially if you get your site built – and should you wish to make changes to it – Elementor will make your life much easier in the long run.

Try and go with a theme that supports Elementor – and be aware of what page builder plugin your framework is using before you start – otherwise you will have headaches making new content.

Good luck!

FREE TOOL to Find out every time a Googler sees your page in search results

If you have a website and are not getting that much traffic – – I wanted to show you how you can see every time a Googler (google user/your potential future customer) sees your site in search results.

This will be in reference to a client I’ve recently been working with – they were not receiving much traffic in Google – however after some research I could confirm that their site was not penalised – so I wanted to see what their current status was – but also I wanted to create a seed list of keywords that I could target for that industry.

Google is a behemoth of a software company – with all the information it keeps. Not only does it keep a log of pretty much every website on the internet and who it links to – but it also keeps a log of every single Google user, and every single Google user’s search. Google also keeps track of which websites were seen by every Google user.

This means that if someone Googles your company – let’s say for example “air conditioning installation sydney” – and looks through the first 2 pages and decides to click on a specific result then Google will also keep a log of every website the user SEES on the search results (not just clicks on). 

This is very useful information to have – for example let’s say you feel that you’re not getting any traffic whatsoever from Google search results – however unbeknownst to you users may still be SEEING your results in search engines – just not clicking on it (for example if you are on page 2 or 3).

Wouldn’t that be useful information to have? 

Imagine if you are on page 2 or 3 for a high traffic keyword all ready – wouldn’t it be useful to then optimise your site for that particular keyword – a keyword you all ready have some success in – instead of starting brand new?

The other part of it is – people are searching for keywords where your site is showing up that you may not have even thought of yet – this will give you some ideas when deciding on what keywords you want to target and optimise your site for.

So – how do you see into Google’s eyes? The process is actually quite simple – it depends on if you currently have a Google Analytics account or not, below I will outline the step:

1) Make sure you have an Analytics account or a Google account

If you have an @gmail.com account – or if you all ready have an Analytics account then you are set. Otherwise you can create a Google account easily. Just go to the URL below and enter your first and last name, a password, a username that you would like. You may be required to verify your account using a mobile number so make sure you have your phone handy. 

https://accounts.google.com/signup/v2/webcreateaccount?continue=https%3A%2F%2Fsearch.google.com%2Fsearch-console%3Futm_source%3Dabout-page&hl=en-US&flowName=GlifWebSignIn&flowEntry=SignUp

Also note that you don’t necessarily need a Gmail account and can use another email if you like – this may make things easier in that you receive emails to the email you check often by habit instead of having to check another email to see any updates on your site.

You’ll need to verify your email address by entering the code that is sent into the Google sign up step:

Image 2018-10-10 at 4.40.38 PM.png

Google will ask you to enter some personal details – note that your mobile is optional. 

Image 2018-10-10 at 4.41.30 PM.png

2) Add Property

Once you click on ‘Next’ after Terms and Conditions you’ll be taken to a page where Google will ask you to enter the URL of the site you would like to see Google Search data for. Simply enter in the URL as http://www.yoursite.com.

Once you enter your URL you’ll need to verify your ownership of the domain – so Google can trust that you really are the owner (otherwise anyone could spy on someone else’s domain for free). 

There are two main ways to verify your site – HTML file and HTML tag. 

Image 2018-10-10 at 6.25.39 PM.png

If your site is using WordPress then I suggest the HTML tag method – all you need to do is login to your WordPress and then click on ‘Appearance’ -> ‘Editor’

Image 2018-10-10 at 6.27.08 PM.png

Once in the Editor page (dismiss the warning that you could screw the site up – you’ll only be making one small change so there’s little risk of damaging your site).

Find the theme header file on the right (it’ll usually be called header.php) and click to edit it

Image 2018-10-10 at 6.28.49 PM.png

In the Verify Ownership page in Google Search Console click the drop down for HTML tag and copy the <meta> tag

Image 2018-10-10 at 6.32.50 PM.png

Then paste the <meta> tag anywhere between the <head> and </head> text in the header.php file – you can see I’ve pasted it into the file below:

Image 2018-10-10 at 6.39.08 PM.png

Click the ‘Update File’ button once you add the <meta> tag and then click on ‘Verify’ in the Google Search Console screen – you’ll get a message saying that your property has been verified:

Image 2018-10-10 at 6.40.47 PM.png

Once you’ve done this you’ll have to wait about 24-48 hours to see any useful data in your console. 

Image 2018-10-10 at 6.43.43 PM.png

Get the data

Now when you come back in a couple of days and login simply click on ‘Performance’ on the left

Image 2018-10-10 at 7.00.04 PM.png

Then click the download button and click on Download CSV.

You’ll now have a spreadsheet similar to this – with 5 columns:

Image 2018-10-10 at 7.01.37 PM.png

The columns will let you know:

Query – the query Googlers searched for where you came up Clicks – the amount of clicks your website has received for that query Impressions – the amount of time your website appeared on a page that a Googler was viewing
CTR – the percentage of people that clicked your ad vs the people that viewed it – for example if on average someone clicks your ad once for every 3 times it’s viewed you would have a 25% CTR
Position – the average position at which your site appears under for a particular keyword, so if position is 74 for example – it means you show up as result #4 on page #7 (not the best place to start from)

Finding out what keyword is useful

This step will require some custom software – you can use Rank Tracker – which is a free download by clicking on the link below:

https://www.link-assistant.com/rank-tracker/download.html

I have the paid version and I assume this will work in the free version (otherwise just send the .csv file over to me and I can do this for you) – simply open Rank Tracker – create a New Project and then paste the keywords from the .csv file into the text field:

Image 2018-10-10 at 7.21.33 PM.png

Personally I remove Bing and Yahoo.com.au from the preferred search engines and just leave Google.com.au

Then click on the refresh button to get – this is not really that useful because you all ready have the average position that they keywords are at from the .csv file – however what you really want is the traffic for the particular keyword

Image 2018-10-10 at 7.22.38 PM.png

So click on that one

Once you have a list of the searches you can sort by the most popular searches and see which ones you are ranking for all ready.

In the case of my client you can see he is ranked position 33 for ‘sound proofing material’ – a keyword that gets 10,000 – 100,000 searches a month. While position 33 is pretty much invisible in Google’s eyes – it’s still a starting point and I can use that to then research other keywords. 

So there it is – looking through Google’s lens to see exactly where you are right now – what keywords you’re showing for and which keywords are the most powerful – a great way to start a campaign – and by the way all the software I describe above is absolutely free.

Good luck!